Welcome

Welcome! I'm so glad that you've stopped by to visit. This blog started with Paper Crafts but since that road leads to so many others it has since become a place for all types of crafting adventures from card making to DIY home projects. Scroll down on the right to find posts by labels and dates or try my search bar to find your inspiration.

Happy Crafting!


Showing posts with label Tutorial. Show all posts

Thursday, June 28, 2012

Fabric Paint & A Canvas

Fabric Paint & Canvas
So just like the picture above says, the big deal about this is using Fabric Paint to make your design for your canvas,—no Silhouettes, or Stencils or the ‘using sicker letters and peeling them off’,—Here’s a brief explanation of what I did:

I created this canvas as a gift for my mom.  My son calls her “Mamaie” (Ma-mai-eh) which is Grandma in Romanian and their favorite song to sing together is “You Are My Sunshine” and so this little canvas was born.

I prepped my canvas and painted it with Acrylic paint.  I was going for it to look like the sun was rising and chasing away the darkness; my mom thought that it looks like the deep ocean and then coming into the shore and the sandy beach.  Either way I just painted it by plopping a ‘blop’ of acrylic paint in the section I wanted it, one each of blue, turquoise, and yellow, and then blended them across the canvas horizontally and then down into each other.

I put the canvas aside to let it dry.  In Photoshop I created a little subway art with the words of “You Are My Sunshine” that I wanted on the canvas.  I printed it out on plain paper.
Mamaie Subway Art
Grab a FREEBIE on my Facebook Page under my “Exclusive Content” tab.  Get your own “You Are My Sunshine” Subway art.


Then I grabbed my dimensional Fabric Paint
Tulip Slick Fabric Paint
and a piece of wax paper.  I lay my subway art down on the table and laid my wax paper over top and taped it down a bit so it wouldn’t move on me.  Then I got to work tracing the words in Fabric Paint onto the wax paper.  (When doing this you want to make sure that you’re not going too thin with the fabric paint so it’s easy to peel off the wax paper when it dries.  If the paint is too thin then your letters/art may rip or stretch out.)

I also printed out a little abstract doily that I traced too.  I let them dry for a couple hours.  Once dry, I began to peel the letters off and arrange onto my Canvas the way I wanted.  When I was completely happy with it (I had to make sure cause after the next step there was no going back) I grabbed my Mod Podge (I LOVE this stuff) and went over the letters and doily to glue it all down.  You may need to hold onto the letters with your finger or the end of a paintbrush so wen you brush the Mod Podge over top you don’t pick up any letters—they’re a pain to straighten down again.  After the letters and my doily were dry I covered my entire canvas with Mod Podge to seal it. 
You Are My Sunshine
VoilĂ !  My beautiful canvas! 
Now depending on your canvas and what type of finished sides it has you may be satisfied and move on to another project.  Well I wasn’t satisfied. So…
Border
…I grabbed some pretty cardstock and cut strips to match the width of the sides of my canvas and Mod Podg-ed it on;  then sealed the sides with another coat on top.  Gave my canvas a pretty ribbon effect all around…also hid a couple ugly staples (I hate it when they staple canvases on the side!)
There now you have your own beautiful piece of art and I’m sure many more will be on the way…at least for me they will be!

Monday, June 18, 2012

Mother’s Day Brunch

Mother's Day Brunch
So you might be looking at this picture and thinking that I’m slightly behind the times seeing as how it was Father’s Day yesterday and Mother’s Day was about a month ago; or you might be thinking that I like to plan really far ahead!  Either way read on because, although this is what I did to celebrate Mother’s Day this year, my Ideas, Tutorials, and Recipes can be used for any party, and any time of the year. 

Amanda's Parties To Go
So I knew I wanted a theme that was really bright and happy.  Something a little bit modern and definitely fun.  Off to Pinterest I went in search of inspiration.  I came across the picture above.  It’s from Amanda's Parties To Go.  She has a great site and freebies to print.  Her freebies also inspired me to make my own from scratch.  I made them using Photoshop.   
Mother's Day Signs
I made these signs to stick in with my flowers in vases and to pin to crepe streamers which I tied around the chairs. 

Sign
Sign 2
Sign 3
I also made little circle tags to attach to my napkin rings and narrow tags to wrap around the stems of glasses.
Mother's Day Brunch Tags
NapkinNapkin Ring


I really like how my napkin rings turned out.  They were so very easy to do.  Here’s How I made them… (click 'read more' to keep reading)

Tuesday, April 10, 2012

Dominic’s Erasable Drawing Board

So this post goes along with my last one…"To-Do, To-Do";  actually it’s what inspired this project for my little guy.  My son Dominic loves to draw and scribble and I considered getting him one of those kiddie drawing easels but are they ever expensive so what’s a crafty mom to do?  Make a dry erase board herself! 
Dominic's Drawing Board
So let me show you what I did.  This isn’t going to be a complete Tutorial, for that you can go over to my last post to see what I did.  The steps here are basically the same.
First I headed to the dollar store for my supplies…
  • a large piece of Hardboard (it’s kind of like very hard cardboard that’s covered in smooth poster board…that’s the best way I can describe it) $1.00
  • Roll of White Board Paper $1.00
  • Jumbo Puzzle $1.00
  • Dry Erase Markers $0.75
Cut a piece from your roll of paper to match the length of your board;  don’t worry about the width matching up, you’ll cover that with your puzzle
Cut Paper
Peel back the backing from the paper and carefully and slowly adhere to your board.  After that glue the puzzle pieces on the sides of the board.  I used Tacky Glue and Modge Podge to stick the puzzle pieces on.  A Tip:  Arrange your puzzle pieces first without gluing to see what arrangement you like.
Now if you want you can make a marker holder to attach to the board too.
Grab a toilet paper roll (or a paper towel roll), and cut it in half lengthwise. 
Cut TP Roll
Tape the two pieces of roll together. 
Tape Together
Then staple a piece of cardstock to the roll that is the same length as the roll. You need the piece of cardstock so you have a flat surface to attach to the drawing board.

Staple on the edge of a length of the roll.
Staple
Now cut a piece of fabric or some patterned paper and cover up the roll including the stapled cardstock.
Covered Roll
Use Modge Podge to glue the flat part of the roll (the cardstock we stapled earlier) to the drawing board.  Now you have the perfect place for markers.
Marker Holder
You can attach it to the wall with a picture hooks or whatever you like.  I used just the removable strips from 3M, the ones that come with the hooks.
  P1180450
I just used the strip straight on the back of the board without the hook.  Works great and won’t cause damage to my walls.
Look at my little guy enjoying his new place to scribble!
Dominic DrawingDominic Admiring
I hope you and your kiddies will enjoyed this project!
Until next time, Happy Crafting!

Friday, March 23, 2012

To Do, To Do!

To Do!

     So if you’re at all like me you have a 100 things to do, about 5 min to do them in (okay, so technically it’s more like 15-16 hours but it feels like 5 min), and 1000 distractions to keep you from actually finishing any one task.  Enter the “To Do” list.  Yes I know this is not a new idea, I’m sure the ancient Egyptians had the hieroglyphic “To Do” carved into their walls, which is where we should have kept our lists too.  Not carved of course, something more “semi-permanent”, such as a separate board on our walls;  at least that way we’d have less random pieces of paper around, no accidentally thrown out phone numbers, and we could even keep the receipt for that dress we’ll never fit into pinned up there too!   

     Seems we’ve caught up to the thinking of those ancient Egyptians because now we have the ever so popular message boards everywhere.  Usually comprising of a white board or chalk board and either cork or pins or ribbon to help hold loose items all in your line of sight.  Now you could go buy one, and spend $10 and up, but where’s the fun in that?  Let’s make one.  

    Now you could turn this idea into something much bigger and fancier and make it all your own.  I’m just here to get the ball rolling, and I do hope you’ll roll on and on…

Supplies
Just a note…you can find very inexpensive contact paper at the dollar store.  Sometimes they even have white board paper rolls too!

Measure and Cut
Measure Frame
Border Lines
You can click on the picture above to see it bigger.

Cut out Frame
Decorate Frame
Measure Contact Paper
Peel off Contact Paper
Picture9
Adhesive
Adhered to Cardboard
Attach Wire
Embellish and FunctionHanging Up
I hope you enjoyed!
Happy Crafting!


Sunday, October 2, 2011

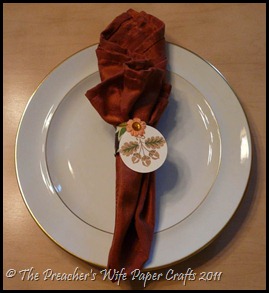
Autumn Napkin Rings

Picture12


It’s almost Thanksgiving here in Canada and, like I promised in my last post, I have some napkin rings to add some fall flair to your dinner table.  You can also see these napkin rings in a table setting at Leia's Culinary Treasures, my mothers fabulous blog.  While these particular ones are for autumn, you can vary this project for all sorts of occasions.  I hope you enjoy making these for your holiday feast.

Picture1
Picture2
Picture3
Picture4
Picture5
Picture6


Picture7(If you don’t know basic steps for embossing check out my post "Lampshade" to see the simple steps.)

Picture8
Picture9Picture10
             Picture11
These napkin rings are so easy to make.  I hope you try them out and some fun to your table.
Happy Scrapping!